Langkah- Langkah Instalasi Face Recognition
1. Expand Filesystem.
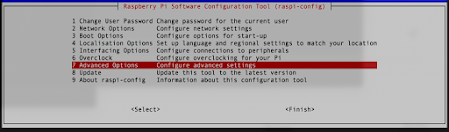
Berangkat ke terminal, ketik : sudo raspi-config, nanti akan muncul tampilan
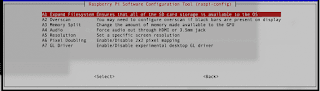
Pilih Advanced Option >
Pilih Expand Filesystem, terus kasi perintah, sudo reboot untuk restart raspberry pi nya.
2. Hemat memori dengan menghapus software yang gak perlu
langsung ke terminal gaes. masukin perintah ini satu-satu :
sudo apt-get purge wolfram-engine
sudo apt-get purge libreoffice*
sudo apt-get clean
sudo apt-get autoremove
3. Install software / program yang diperlukan untuk menjalankan face-recognitionnya :
sudo apt-get update && sudo apt-get upgrade -y
sudo apt-get install build-essential cmake unzip pkg-config -y
sudo apt-get install libjpeg-dev libpng-dev libtiff-dev -y
sudo apt-get install libavcodec-dev libavformat-dev libswscale-dev libv4l-dev -y
sudo apt-get install libxvidcore-dev libx264-dev -y
sudo apt-get install libgtk-3-dev -y
sudo apt-get install libcanberra-gtk* -y
sudo apt-get install libatlas-base-dev gfortran -y
sudo apt-get install python3-dev -y
4. Download OpenCV :
cd ~
wget -O opencv.zip https://github.com/opencv/opencv/archive/4.1.0.zip
wget -O opencv_contrib.zip https://github.com/opencv/opencv_contrib/archive/4.1.0.zip
unzip opencv.zip
unzip opencv_contrib.zip
mv opencv-4.1.0 opencv
mv opencv_contrib-4.1.0 opencv_contrib
rm -f opencv.zip opencv_contrib.zip
5. Instal pip
wget https://bootstrap.pypa.io/get-pip.py
sudo python3 get-pip.py
6. Persiapkan virtual environment
sudo pip install virtualenv virtualenvwrapper
sudo pip3 install virtualenv virtualenvwrapper
sudo rm -rf ~/get-pip.py ~/.cache/pip
sudo nano ~/.profile
masukkan ini ke sana :
export WORKON_HOME=$HOME/.virtualenvs
export VIRTUALENVWRAPPER_PYTHON=/usr/bin/python3
source /usr/local/bin/virtualenvwrapper.sh
simpan.
source ~/.profile
mkvirtualenv cv -p python3
workon cv
7. install Numpy : pip install numpy
8. Compile openCV :
cd ~/opencv
mkdir build
cd build
cmake -D CMAKE_BUILD_TYPE=RELEASE \
-D CMAKE_INSTALL_PREFIX=/usr/local \
-D OPENCV_EXTRA_MODULES_PATH=~/opencv_contrib/modules \
-D ENABLE_NEON=ON \
-D ENABLE_VFPV3=ON \
-D BUILD_TESTS=OFF \
-D OPENCV_ENABLE_NONFREE=ON \
-D INSTALL_PYTHON_EXAMPLES=OFF \
-D BUILD_EXAMPLES=OFF ..
9. Swab
sudo nano /etc/dphys-swapfile
CONF_SWAPSIZE=2048
sudo dphys-swapfile setup
sudo dphys-swapfile swapon
free -m
make -j4
sudo make install
sudo ldconfig
10. Link
ln -s /usr/local/lib/python3.5/site-packages/cv2/python-3.5/cv2.cpython-35m-arm-linux-gnueabihf.so ~/.virtualenvs/cv/lib/python3.5/site-packages/cv2.so
11. Test
workon cv
python
>>> import cv2
>>> cv2.__version__
>>> exit()
12. lanjut instal tambahan software yang dibutuhkan
workon cv
pip install dlib
pip install face_recognition
pip install imutils
13. perintah Training Dataset :
masukkan data foto di folder dataset ya kemudian eksekusi perintah ini untuk training
python face-encoding.py --dataset dataset --encodings encodings.pickle --detection-method hog
14. running program :
python face-recognition-video.py --cascade haarcascade_frontalface_default.xml --encodings encodings.pickle
maka frame video camera akan muncul dan akan menampilkan kotak pada wajah jika terdeteksi wajah. Selamat mencoba dan tetap semangat !!
Fanspage Alka Technology Instagram Alka Technology
- Salam Mikrokontroler -
Komentar